Summary: in this tutorial, you will learn how to set up a development environment that allows you to work with MySQL and JDBC.
To set up the development environment, you need to:
- Download & install JDK
- Download and install the IntelliJ IDE
- Download MySQL Connector/J
- Load a sample database
Download & install JDK
First, open the Java Download page and download the latest JDK. Note that we’ll use the JDK 21.
Second, install the JDK from the installer.
Download & Install IntelliJ IDE
First, download the IntelliJ IDE from the JetBrains website.
Second, install it on your computer.
Download and install MySQL Connector/J
First, open the Download Connector/J page.
Second, select your appropriate platform and click the Download button. We’ll use the independent platform.
It’ll take you to the login / sign-up page. If you don’t want to log in or sign up for an account. You can scroll down and click the link No thanks, just start my download.
Third, extract the download file into a directory a jar file such as mysql-connector-j-8.2.0.jar. You’ll use this jar file in the next tutorial for connecting to a MySQL server from Java programs.
Load MySQL JDBC sample database
We will use a sample database named mysqljdbc for the demonstration purposes. The following illustrates the database diagram:
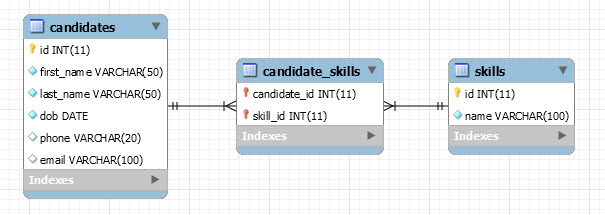
The sample database includes three tables:
candidates: stores candidate data such as first name, last name, date of birth (dob), phone, and email.skills: stores skills of the candidatescandidate_skills: the pivot table links between candidates & skills
You can download the sample database via the following link:
Download MySQL JDBC Sample Database
To load the mysqljdbc sample database to the MySQL server, you follow these steps:
First, extract the download file into a directory such as D:\sampledb\mysql\mysqljdbc.sql
Second, open Command Prompt on Windows or Terminal on Unix-like systems.
Third, connect to the MySQL server:
mysql -u root -pFourth, load the database into the MySQL server using the SOURCE command:
SOURCE D:/sampledb/mysql/mysqljdbc.sqlCode language: JavaScript (javascript)Fifth, list all databases in the server to verify if we load the database successfully:
SHOW DATABASES;Output:
+--------------------+
| Database           |
+--------------------+
| classicmodels      |
| information_schema |
| mysql              |
| mysqljdbc          |
| performance_schema |
| sys                |
+--------------------+
6 rows in set (0.00 sec)Code language: JavaScript (javascript)
The output shows the mysqljdbc database, meaning that we have successfully loaded the sample database into the MySQL server.
In this tutorial, you have learned how to set up a development environment for working with JDBC & MySQL.